借助于Redis Sentinel(哨兵)和Keepalived,我们可以实现Redis的高可用性。其中Sentinel是个基于Redis HA的解决方案,它支持Redis自身的主从角色替换,所以严格来说它其实只是个Redis的主从监控服务。当Redis主从发生变化,由于Master的IP发生了变化,我们需要借助于Keepalived的VIP来实现IP的漂移。
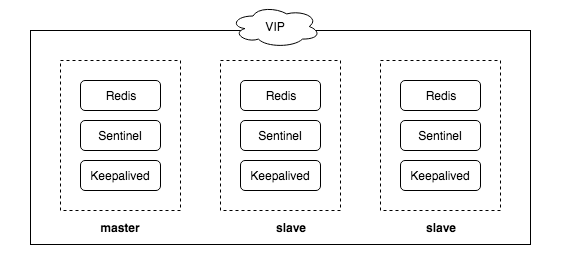
本文中我们将部署三个节点的Redis,并且使用Docker容器来代替节点,我们将在容器内同时运行Redis,Sentinel以及Keepalived。
Docker镜像
首先我们先创建一个Dockerfile,安装Redis,Sentinel和Keepalived。
FROM debian:9.4

RUN mkdir -p /etc/redis /etc/keepalived /opt/redis-ha /var/log/redis
RUN apt-get update && apt-get -y install redis-sentinel keepalived
COPY ./run.sh /opt/redis-ha

WORKDIR /opt/redis-ha

CMD ["./run.sh"]
其中,run.sh用来启动各个服务,简单起见这里并没有关注容器内的多进程管理。
/opt/redis-ha/run.sh
#!/bin/bash

# Run redis
echo "starting redis..."
redis-server /etc/redis/redis.conf --daemonize yes

# Start keepalived
echo "starting keepalived..."
service keepalived start

# Start sentinel
echo "starting redis sentinel..."
exec redis-server /etc/redis/sentinel.conf --sentinel --protected-mode no
配置
在上面的启动脚本run.sh中,我们使用到了配置文件,redis.conf,sentinel.conf以及keepalived.conf。并且Master节点和Slave节点的配置略有不同。注意到有些配置文件内容是完全相同的,比如sentinel的三个配置文件,但是我们这里还是创建了不同的文件,因为sentinel运行中会修改这些配置文件的内容,我们后面会将配置文件Mount到不同的容器中,所以这里需要不同的配置文件。
Redis
redis-master.conf
port 6379
bind 0.0.0.0
logfile "/var/log/redis/redis.log"
redis-slave1.conf, _redis-slave2.conf
port 6379
bind 0.0.0.0
slaveof master 6379
logfile "/var/log/redis/redis.log"
Sentinel
sentinel-master.conf, sentinel-slave1.conf, sentinel-slave2.conf
port 26379
protected-mode no
sentinel monitor redis-ha master 6379 2
sentinel failover-timeout redis-ha 10000
sentinel down-after-milliseconds redis-ha 5000
Keepalived
keepalived-master.conf
vrrp_instance VI_1 {
    state MASTER
    interface eth0
    virtual_router_id 1
    priority 200
    advert_int 1
    authentication {
        auth_type PASS
        auth_pass 123456
    }
    virtual_ipaddress {
        172.19.0.100
    }
}
keepalived-slave.conf
vrrp_instance VI_1 {
    state BACKUP
    interface eth0
    virtual_router_id 1
    priority 100
    advert_int 1
    authentication {
        auth_type PASS
        auth_pass 123456
    }
    virtual_ipaddress {
        172.19.0.100
    }
}
启动
docker-compose.yml
version: '2'
services:
  master:
    image: redis-ha:1.0
    container_name: master
    volumes:
      - ./redis-master.conf:/etc/redis/redis.conf
      - ./sentinel-master.conf:/etc/redis/sentinel.conf
      - ./keepalived-master.conf:/etc/keepalived/keepalived.conf
      - ./redis-log-master:/var/log/redis
    networks:
        - redis-ha
    privileged: true
    cap_add:
      - NET_ADMIN

  slave1:
    image: redis-ha:1.0
    container_name: slave1
    volumes:
      - ./redis-slave1.conf:/etc/redis/redis.conf
      - ./sentinel-slave1.conf:/etc/redis/sentinel.conf
      - ./keepalived-slave.conf:/etc/keepalived/keepalived.conf
      - ./redis-log-slave1:/var/log/redis
    networks:
        - redis-ha
    privileged: true
    cap_add:
      - NET_ADMIN

  slave2:
    image: redis-ha:1.0
    container_name: slave2
    volumes:
      - ./redis-slave2.conf:/etc/redis/redis.conf
      - ./sentinel-slave2.conf:/etc/redis/sentinel.conf
      - ./keepalived-slave.conf:/etc/keepalived/keepalived.conf
      - ./redis-log-slave2:/var/log/redis
    networks:
        - redis-ha
    privileged: true
    cap_add:
      - NET_ADMIN

networks:
  redis-ha:
    external: false
$ docker-compose up -d
Creating slave2 ... done
Creating slave1 ... done
Creating master ... done
$ docker ps | grep redis-ha
de439334a892        redis-ha:1.0        "./run.sh"               43 seconds ago      Up 46 seconds                                  master
51fab8769568        redis-ha:1.0        "./run.sh"               43 seconds ago      Up 47 seconds                                  slave1
722a58195b3c        redis-ha:1.0        "./run.sh"               43 seconds ago      Up 47 seconds                                  slave2
注意:由于我们直接将配置文件Mount到容器中使用,Redis和Sentinel在运行过程中会修改配置文件的内容,所以建议将配置文件复制保留一份,每次运行都使用未被修改的配置文件,否则第二次运行将会出错。
验证
注意:这里我们只选择性地显示了部分输出
集群状态
验证Redis集群信息:
$ docker exec -it master redis-cli info
# Replication
role:master
connected_slaves:2
slave0:ip=172.19.0.3,port=6379,state=online,offset=25348,lag=1
slave1:ip=172.19.0.2,port=6379,state=online,offset=25618,lag=0
master_repl_offset:25618
repl_backlog_active:1
repl_backlog_size:1048576
repl_backlog_first_byte_offset:2
repl_backlog_histlen:25617
验证Sentinel信息(Sentinel使用26379端口):
$ docker exec -it master redis-cli -p 26379 info
# Sentinel
sentinel_masters:1
sentinel_tilt:0
sentinel_running_scripts:0
sentinel_scripts_queue_length:0
sentinel_simulate_failure_flags:0
master0:name=redis-ha,status=ok,address=172.19.0.4:6379,slaves=2,sentinels=3
Failover
关掉master节点:
$ docker stop master
观察Slave1,Slave2上Sentinel的log:
1:X 31 May 08:09:39.210 # +sdown master redis-ha 172.19.0.4 6379
1:X 31 May 08:09:39.211 # +sdown sentinel 42d4ef8d07f14d091a35f7531be48b7a5291c17d 172.19.0.4 26379 @ redis-ha 172.19.0.4 6379
1:X 31 May 08:09:39.289 # +odown master redis-ha 172.19.0.4 6379 #quorum 2/2
1:X 31 May 08:09:39.290 # +new-epoch 1
1:X 31 May 08:09:39.290 # +try-failover master redis-ha 172.19.0.4 6379
1:X 31 May 08:09:39.300 # +vote-for-leader 1fd8f68955ecc717922a8a8e4ac591f4de3843cb 1
1:X 31 May 08:09:39.314 # e3a5af8ee26535a076f911c8dcdc3f84d70917a8 voted for 1fd8f68955ecc717922a8a8e4ac591f4de3843cb 1
1:X 31 May 08:09:39.352 # +elected-leader master redis-ha 172.19.0.4 6379
1:X 31 May 08:09:39.352 # +failover-state-select-slave master redis-ha 172.19.0.4 6379
1:X 31 May 08:09:39.437 # +selected-slave slave 172.19.0.3:6379 172.19.0.3 6379 @ redis-ha 172.19.0.4 6379
1:X 31 May 08:09:39.437 * +failover-state-send-slaveof-noone slave 172.19.0.3:6379 172.19.0.3 6379 @ redis-ha 172.19.0.4 6379
1:X 31 May 08:09:39.493 * +failover-state-wait-promotion slave 172.19.0.3:6379 172.19.0.3 6379 @ redis-ha 172.19.0.4 6379
1:X 31 May 08:09:40.357 # +promoted-slave slave 172.19.0.3:6379 172.19.0.3 6379 @ redis-ha 172.19.0.4 6379
1:X 31 May 08:09:40.357 # +failover-state-reconf-slaves master redis-ha 172.19.0.4 6379
1:X 31 May 08:09:40.442 * +slave-reconf-sent slave 172.19.0.2:6379 172.19.0.2 6379 @ redis-ha 172.19.0.4 6379
1:X 31 May 08:09:41.352 * +slave-reconf-inprog slave 172.19.0.2:6379 172.19.0.2 6379 @ redis-ha 172.19.0.4 6379
1:X 31 May 08:09:41.352 * +slave-reconf-done slave 172.19.0.2:6379 172.19.0.2 6379 @ redis-ha 172.19.0.4 6379
1:X 31 May 08:09:41.418 # -odown master redis-ha 172.19.0.4 6379
1:X 31 May 08:09:41.418 # +failover-end master redis-ha 172.19.0.4 6379
1:X 31 May 08:09:41.418 # +switch-master redis-ha 172.19.0.4 6379 172.19.0.3 6379
1:X 31 May 08:09:41.419 * +slave slave 172.19.0.2:6379 172.19.0.2 6379 @ redis-ha 172.19.0.3 6379
1:X 31 May 08:09:41.419 * +slave slave 172.19.0.4:6379 172.19.0.4 6379 @ redis-ha 172.19.0.3 6379
1:X 31 May 08:09:46.457 # +sdown slave 172.19.0.4:6379 172.19.0.4 6379 @ redis-ha 172.19.0.3 6379
1:X 31 May 08:09:39.150 # +sdown master redis-ha 172.19.0.4 6379
1:X 31 May 08:09:39.150 # +sdown sentinel 42d4ef8d07f14d091a35f7531be48b7a5291c17d 172.19.0.4 26379 @ redis-ha 172.19.0.4 6379
1:X 31 May 08:09:39.309 # +new-epoch 1
1:X 31 May 08:09:39.314 # +vote-for-leader 1fd8f68955ecc717922a8a8e4ac591f4de3843cb 1
1:X 31 May 08:09:40.291 # +odown master redis-ha 172.19.0.4 6379 #quorum 2/2
1:X 31 May 08:09:40.291 # Next failover delay: I will not start a failover before Thu May 31 08:10:00 2018
1:X 31 May 08:09:40.445 # +config-update-from sentinel 1fd8f68955ecc717922a8a8e4ac591f4de3843cb 172.19.0.3 26379 @ redis-ha 172.19.0.4 6379
1:X 31 May 08:09:40.446 # +switch-master redis-ha 172.19.0.4 6379 172.19.0.3 6379
1:X 31 May 08:09:40.447 * +slave slave 172.19.0.2:6379 172.19.0.2 6379 @ redis-ha 172.19.0.3 6379
1:X 31 May 08:09:40.450 * +slave slave 172.19.0.4:6379 172.19.0.4 6379 @ redis-ha 172.19.0.3 6379
1:X 31 May 08:09:45.480 # +sdown slave 172.19.0.4:6379 172.19.0.4 6379 @ redis-ha 172.19.0.3 6379
我们看到Sentinel已经执行了Failover将slave1提拔成了Master:
$ docker exec -it slave1  redis-cli info
# Replication
role:master
connected_slaves:1
slave0:ip=172.19.0.2,port=6379,state=online,offset=16406,lag=1
master_repl_offset:16541
repl_backlog_active:1
repl_backlog_size:1048576
repl_backlog_first_byte_offset:2
repl_backlog_histlen:16540
Keepalived
首先验证VIP是否可用。注意我们是通过容器来模拟节点,在之前的docker-compose.yml中,我们的容器都加入了自定义网络redis-ha中。我们需要在容器内去验证VIP的可用性。
$ docker exec -it master redis-cli -h 172.19.0.100 -p 6379 ping
PONG
$ docker exec -it slave1 redis-cli -h 172.19.0.100 -p 6379 ping
PONG
$ docker exec -it slave2 redis-cli -h 172.19.0.100 -p 6379 ping
PONG
可以看到VIP在容器内是可用的。我们再看看VIP绑定到了哪个节点
$ docker exec -it master ip a
1: lo: <LOOPBACK,UP,LOWER_UP> mtu 65536 qdisc noqueue state UNKNOWN group default qlen 1
    link/loopback 00:00:00:00:00:00 brd 00:00:00:00:00:00
    inet 127.0.0.1/8 scope host lo
       valid_lft forever preferred_lft forever
2: tunl0@NONE: <NOARP> mtu 1480 qdisc noop state DOWN group default qlen 1
    link/ipip 0.0.0.0 brd 0.0.0.0
3: ip6tnl0@NONE: <NOARP> mtu 1452 qdisc noop state DOWN group default qlen 1
    link/tunnel6 :: brd ::
147: eth0@if148: <BROADCAST,MULTICAST,UP,LOWER_UP> mtu 1500 qdisc noqueue state UP group default
    link/ether 02:42:ac:13:00:04 brd ff:ff:ff:ff:ff:ff link-netnsid 0
    inet 172.19.0.4/16 brd 172.19.255.255 scope global eth0
       valid_lft forever preferred_lft forever
    inet 172.19.0.100/32 scope global eth0
       valid_lft forever preferred_lft forever
可以看到172.19.0.100已经绑定到了Master节点。
接下来,我们将Master节点关掉,看VIP是否可用,又绑定到了哪个节点上:
$ docker stop master
master
$ docker exec -it slave1 redis-cli -h 172.19.0.100 -p 6379 ping
PONG
$ docker exec -it slave2 redis-cli -h 172.19.0.100 -p 6379 ping
PONG
$ docker exec -it slave2 ip a
1: lo: <LOOPBACK,UP,LOWER_UP> mtu 65536 qdisc noqueue state UNKNOWN group default qlen 1
    link/loopback 00:00:00:00:00:00 brd 00:00:00:00:00:00
    inet 127.0.0.1/8 scope host lo
       valid_lft forever preferred_lft forever
2: tunl0@NONE: <NOARP> mtu 1480 qdisc noop state DOWN group default qlen 1
    link/ipip 0.0.0.0 brd 0.0.0.0
3: ip6tnl0@NONE: <NOARP> mtu 1452 qdisc noop state DOWN group default qlen 1
    link/tunnel6 :: brd ::
143: eth0@if144: <BROADCAST,MULTICAST,UP,LOWER_UP> mtu 1500 qdisc noqueue state UP group default
    link/ether 02:42:ac:13:00:02 brd ff:ff:ff:ff:ff:ff link-netnsid 0
    inet 172.19.0.2/16 brd 172.19.255.255 scope global eth0
       valid_lft forever preferred_lft forever
    inet 172.19.0.100/32 scope global eth0
       valid_lft forever preferred_lft forever
可以看到VIP能够正常使用,并且VIP已经绑定到了Slave2上。
TroubleShootings
Sentinel间无法通信
验证Sentinel之间的连通性,下面我们从master节点的Sentinel发PING请求到slave节点。如果可以连通,将得到PONG,但在实验过程中,曾经遇到过如下的错误:
$ docker exec -it master redis-cli -h slave1 -p 26379 ping
(error) DENIED Redis is running in protected mode because protected mode is enabled, no bind address was specified, no authentication password is requested to clients. In this mode connections are only accepted from the loopback interface. If you want to connect from external computers to Redis you may adopt one of the following solutions: 1) Just disable protected mode sending the command 'CONFIG SET protected-mode no' from the loopback interface by connecting to Redis from the same host the server is running, however MAKE SURE Redis is not publicly accessible from internet if you do so. Use CONFIG REWRITE to make this change permanent. 2) Alternatively you can just disable the protected mode by editing the Redis configuration file, and setting the protected mode option to 'no', and then restarting the server. 3) If you started the server manually just for testing, restart it with the '--protected-mode no' option. 4) Setup a bind address or an authentication password. NOTE: You only need to do one of the above things in order for the server to start accepting connections from the outside.
错误原因已经描述的非常清楚,在保护模式下,没有配置bind和Auth,访问被拒绝。最简单解决的办法就是关掉保护模式,注意在前面Sentinel的配置中,我们将protected-mode设成了no,该配置默认为yes。